Search This Blog

Report Distribution Using AddDistributionOption

In my previous post on Report Distribution Using XML Publisher - Right Report To The Right Person, we have seen how to distribute the report to the right person, without any coding efforts. Because we have that feature pre-built in XML Publisher. 

What if, when SQR process comes with a similar requirement?

This can be achieved by the AddDistributionOption, from the CreateProcessRequest family.

A small trick has to be implemented to launch n number of process request based on the parameters. 

&RQST.AddDistributionOption("User", "Your User ID"); will take care of distributing the reports from there, based on the User ID fed into it.

You can use this approach for the XML Publisher and nVision reports too.

Like we have an alternate way in XML Publisher, there is a way to do the same in nVision. However, I did not get a chance to try out the same.

If anyone has done it before, feel free to share the tip here.

Report Distribution Using XML Publisher - Right Report To The Right Person

Consider the situation where you have to run certain report, which is keyed by the Business Unit and Company. Once the report is run using a job using a batch user id, the report should go to the CEO of the Company and Business Unit combination. 

The above requirement can be achieved as below through an XML Publisher report.

You might know the bursting feature in XML Publisher, which will help you to slice the report based on a field. As the first step, to extend this functionality, I added another Colum (say BU_COMP_MIX) to the report staging table which is a concatenated of the BU and Company. And burst the report on this field. Make Sense?

Now you have to create a view with the CEO details for a Company and Business Unit combination along with the BU_COMP_MIX field. I name the view as AN_CEO_DET_VW. Three fields, with the values fetched from the data sources you have.

Navigate to the Report Definition page: Reporting Tools > XML Publisher > Report Definition

And follow the steps in the below screen shot.

Now try running the report and login as the respective CEO's and verify the report receipt in the Report Manager.

To make the CEO's to view only their own reports, you have to disable the User ID search in the Report Manager page. That can be done by removing the report distribution role from the user profiles.

The above tip might look simple in technical perspective but not in the business view. This matters a LOT!

Component missing from MouseOver Popup Setup. Contact Your System Administrator.

While creating a new component from the copy of several delivered pages, you might see this error on the MouseOver Popup feature.

"Component missing from MouseOver Popup Setup. Contact Your System Administrator."

The solution is simple. You can get there easily, if you are in the mid of a development. However, this error can kill your time, during an upgrade, making you read the related App Package codes and to figure out how my component got missed from the setup.


Solution: There is a setup for MouseOver Popup in 8.52, where you have to authorize a component (mainly happens with the custom ones), for the MouseOver feature.

The setup is under: Set Up HRMS > Common Definitions > Mouse Over PopUp > MouseOver Component Setup.

Provide the component name and the Person Detail view and you are done with the component setup for MouseOver Popup.


And the popup will work as expected.

Multiple Reports in SQR at ease

You can print multiple reports with ease using the simple structure below. 

DECLARE-REPORT can declare n number of reports (max 99) and use it for the respective printing. There is catch at this point. What if the reports are dynamic and you cannot forcast the number of reports that gets generated.

Then the below code can be handy.

You have the while loop and NEW-REPORT part inside it. Make the file name dynamic based on the variables in your code. And that's it. 

No headaches of declaring multiple reports in the begin-setup and you can get n number of reports (max infinity), without the limitation of 99.

Hope, this will be a handy code for you.

XML Publisher - Clean Up

Cleaning Up BI Publisher Metadata

Some people are very specific about the way the data is managed in the system. I have seen several Admins who is very serious about the accurate data in the system, they will always clean up the data in the system, like the perfect housewives maintains a good home. 

In BI Publisher we have a delivered way to do this act. The Application Engine program name is PSXPCLEAN. It tracks and manages the orphaned objects in the system and provides you a report too.

What the different sections does in the AE. It find outs the orphaned definitions to the state record and deletes it in a sequence.

Various sections performs this duty.


This application engine program is delivered in Report and Delete mode. To run the program in Report Only mode, open the application engine program PSXPCLEAN in Application Designer and remove the comment in the following statement in PSXPCLEAN:Main:Start PeopleCode action:

rem PSXPFILECLN_AET.REPORT_ONLY_FLAG = "Y" (which is marked in Yellow below)


From here, the AE starts collecting the info about the missing definitions.


From this point the clean up starts.


A handy tip to know about the AE and the main tables in XMP Publisher for quick reference.

My Reports with No Reports?

You might have came this scenario, if you have worked on the My Reports Pagelet. When you use it for the first time, the reports might now appear here.


When you click on the Report Manager link beneath, it takes you to the Explorer tab, where again you will get the same message.

But the Administration tab might be having the reports but not in the Explorer tab.


To rectify this and to start posting the reports to teh Explorer tab, which will ultimately display the data in the My Reports pagelet, you have to check and activate the following Routing - Service Operations at the Default Local Node.
  • PSRF_FOLDER_CREATE
  • PSRF_REPORT_CREATE
  • PSRF_REPORT_DATE_CHANGE
  • PSRF_REPORT_DELETE

Once you set this up and bounced the server (if required), the My Reports Pagelet will start populating the reports.

Read the Translate Table from SQR

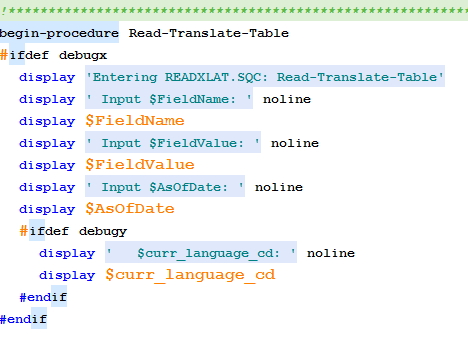
Suggested this SQC when met one colleague trying to write one procedure to read from the XLAT table. Will be a handy tip.

The above requirement is as simple as including an SQC (readxlat.sqc) and passing the parameters to it to get the value back. Lets code smart.


Include the SQC

Pass the Parameters


Get your need fulfilled.

Other two procedures which can be handy at times below.


Example For Strings Table in SQR

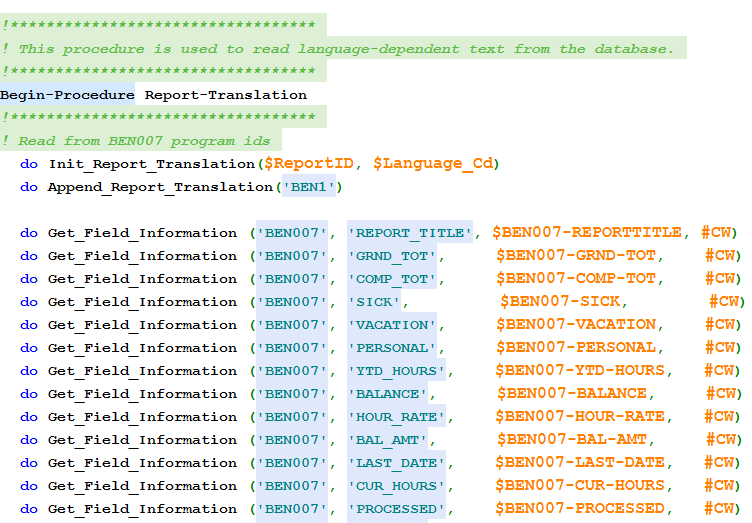
An example for a standard, online configurable SQR program using Strings Table is BEN007.sqr

It is always recommended to follow this method to provide the client a better way to manage the object property via online.


The strings table can be found at this path: Menu > PeopleTools > Utilities > Administration > Strings Table

Search with the program ID, for BEN007 it is the same name.

Reuse SQR XML Tag creation process

I have wrote a post on Payroll Customization Check/Advice stub Modification, few weeks back. There was some interesting learnings that came in the way.

First thing is the XML creation tag, which can be extended to a new SQR with XML Tag creation requirement. This will make the code standard and flexible enough to extend for any data requirement that might come into picture in future.

It is always recommended to code in a way which makes the application configurable and easily extendable. And this one piece will make the life easy for the developer.

The below code part is from the PAY003.sqr file. If you notice to the end of it, there are a lot of procedure calling statements like do Process-SSP-XML-Tag-Beg, do  Process-SSP-XML-Tag-Content, do Process-SSP-XML-Tag-End tags. These are the heros in creating the XML's for the report to the end.


You can leverage these elements for adding new sections to the report upon the requirement that might come up later in the stages.

PeopleSoft Search Framework

Thought of sharing.


Using %ExecuteEdits in SQL

A handy tip.

Insert Example:
INSERT INTO PS_MY_ERROR_TABLE SELECT %Bind(PROCESS_INSTANCE) ,'Staging Table' ,'MY_STAGING_TABLE' , A.EMPLID,'Execute Edits Failed' FROM MY_STAGING_TABLE A WHERE %ExecuteEdits(%EDIT_REQUIRED + %EDIT_PROMPTTABLE + %EDIT_TRANSLATETABLE + %Edit_YesNo, MY_STAGING_TABLE)

Update Example:
UPDATE MY_STAGING_TABLE A2 SET A2.ERROR_FLAG = 'Y' WHERE %ExecuteEdits(%EDIT_REQUIRED + %EDIT_PROMPTTABLE + %EDIT_TRANSLATETABLE + %Edit_YesNo, MY_STAGING_TABLE)

Payroll Customization Check/Advice stub Modification - Objects Involved

An interesting customization. The requirement was to modify the look and feel of the delivered Customization Check and Advice stub.

The objects involved in this:

  • PAY003 – Print Pay Checks: SQR Program
  • DDP003 - Create PDF Paychecks: SQR Program
  • PYCHKUSA - Print US Checks: PSJob
    • PAY003
    • PY_SSP_BUILD (AE)
    • PY_SSP_PRINT (AE)
  • PYDDAUSA - Print US Direct Deposit Advice: PSJob
    • DDP003
    • PY_SSP_BUILD (AE)
    • PY_SSP_PRINT (AE)

The above objects are for two purposes. The SQR Programs creates PDF version of the report along with the XML which is used by the PSJobs to print and display the online versions of the check/advice.

The Report Definitions used by the PSJobs can be found at: Main Menu > Product Related > Payroll for North America > Payroll Processing Controls > Paycheck Options Table


Those are the 4 RTF templates need to be modified for completing the above customization.

So total we have to modify 7 objects. You might be thinking that I got a mistake in the calculation and it should be 6.

Actually 7th one is the pysspxml.sqc program which is used by the above two SQR programs, which plays an integral part in creating the XML tags for the PSJobs.

If there need to be a data change in the RTF templates, you need to touch the XML creation code. And that is far more interesting to work with.