

Oracle PeopleSoft Publishes User Experience Guidelines
Those who are highly interested in UX principles of PeopleSoft, refer the below link. Very interesting...
PeopleSoft Campus Mobile From Oracle

Now there's a lot of buzz around Oracle's Mobile Solution. Even you might have already tried out this solution.
http://bloggingaboutoracle.com/peoplesoft-campus-self-service-mobile/ is one blog which gives you a good info on installing the mobility.
Convert Tab file to CSV and Load
Just a tip for the day.
If you got a tab limited file and want to read it as a CSV file, using the file layout, use the below code snippet.
Local File &TABFILE, &CSVFILE;
Local string &FILE_NAME, &DATA, &NEWDATA;
&FILE_NAME = "Test.txt";
&TAB = Char(9);
&TABFILE = GetFile(&FILE_NAME, "r");
&FileName = &TABFILE.Name;
&POS = Find(".", &FileName);
&NEWFILE_NAME = Substring(&FileName, 1, &POS) | "dat";
&CSVFILE = GetFile(&NEWFILE_NAME, "N", %FilePath_Absolute);
If &TABFILE.IsOpen And
&CSVFILE.IsOpen Then
While &TABFILE.ReadLine(&DATA);
&NEWDATA = Substitute(&DATA, &TAB, ",");
&CSVFILE.WriteLine(&NEWDATA);
End-While;
&TABFILE.Close();
&CSVFILE.Close();
End-If;
Will be handy...
If you got a tab limited file and want to read it as a CSV file, using the file layout, use the below code snippet.
Local File &TABFILE, &CSVFILE;
Local string &FILE_NAME, &DATA, &NEWDATA;
&FILE_NAME = "Test.txt";
&TAB = Char(9);
&TABFILE = GetFile(&FILE_NAME, "r");
&FileName = &TABFILE.Name;
&POS = Find(".", &FileName);
&NEWFILE_NAME = Substring(&FileName, 1, &POS) | "dat";
&CSVFILE = GetFile(&NEWFILE_NAME, "N", %FilePath_Absolute);
If &TABFILE.IsOpen And
&CSVFILE.IsOpen Then
While &TABFILE.ReadLine(&DATA);
&NEWDATA = Substitute(&DATA, &TAB, ",");
&CSVFILE.WriteLine(&NEWDATA);
End-While;
&TABFILE.Close();
&CSVFILE.Close();
End-If;
Will be handy...
Custom Email Templates: Tip
You might have had requirements where you have to build a configurable email page for messaging purpose. People use several ways to accomplish this requirement. Message Catalog, Custom page/component are couple of ways to get around this requirement.
Many might have used Generic Templates for this purpose. For those who haven't, you can try this tip.
Generic Templates are basically for the work flow purpose. You can find this under:
Set Up HCM > Common Definitions > Approvals > Generic Templates
You can extend this feature for your custom email functions.
WL_TEMPLATE_GEN is the underlying record for Generic Templates. When you create templates, you will use %numbers for tagging various parameters in workflow.
 |
| Generic Template Page Sample |
 |
| Corresponding DB data |
These parameters can be substituted in PeopleCode to extend the Generic Templates usability in custom messaging requirements.
Say for example:
&Message = Substitute(&Body, "%5",
&Descr);
Here we replace %4 with the respective description.
And you have the easiness of using a dynamic email template without creating a dedicated page/component.
This will come handy for sure.
Mark the completed Worklist Entry
Below is an example code is to mark the Worklist Entry as completed once the corresponding request is approved.
import PT_WF_WORKLIST:*;
Local WorklistEntry &worklist;
&worklist = create WorklistEntry();
&worklist.busprocname = "Administer Workflow";
&worklist.busactivity = "Send Note";
&worklist.buseventname = "Worklist Note";
&worklist.worklistname = "Worklist Note";
&worklist.instanceid = 2;
&ret = &worklist.SelectByKey();
&worklist.inststatus = "2"; /* mark entry worked */
If (&worklist.Update() <> 0) Then
If (&worklist.Save() <> 0) Then
/* success */
Else
/* handle error */
End-If;
Else
/* handle error */
End-If;
The other values for inststatus are given below. This property is read-write:
0: New worklist entry
1: Selected worklist entry
2: Worked worklist entry
3: Cancel string
Not able to change the Label in Application Designer?
Follow the steps below to resolve the issue.
Launch the Configuration Manager:
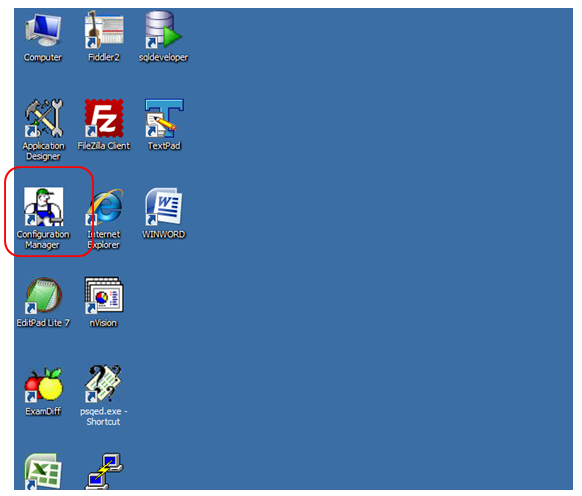
Go to the Client Setup tab:

Check the Application Designer, CM, Data Mover, Install Workstation check boxes and click on the apply button.

Now, restart the application designer and you will be able to change the label.
Track the Locked Objects in Application Designer
There will be scenarios when you forget to unlock a locked object in the Application Designer, which can create unwanted confusions within the team.
The ultra simple SQL below will help to identify and resolve that issue part. The query gives the details about the locked objects in the application designer by a User ID.
SELECT * FROM PSCHGCTLLOCK WHERE OPRID='USERID'
The object type value can be referenced to the table below.
| Object Type ID | PeopleSoft Object |
| 0 | Record |
| 1 | Index |
| 2 | Field |
| 3 | Field Format |
| 4 | Translate Value |
| 5 | Panel/Page |
| 6 | Menu |
| 7 | Panel Group/Component |
| 8 | Record PeopleCode |
| 9 | Menu Item |
| 10 | Query |
| 12 | Tree |
| 13 | Access Group |
| 14 | Color |
| 15 | Style |
| 16 | Not Used |
| 17 | Business Process Definition |
| 18 | Workflow Activity |
| 19 | Security Role |
| 20 | Process Definition |
| 21 | Process Scheduler Server Definition |
| 22 | Process Type |
| 23 | Job |
| 24 | Job schedule |
| 25 | Message Catalog Definition |
| 26 | Dimension |
| 27 | Cube Definition |
| 28 | Cube Instance Definition |
| 29 | Business Interlink |
| 30 | SQL Definition |
| 31 | File Layout Definition |
| 32 | Component Interface |
| 33 | Application Engine Program |
| 34 | Application Engine Sections |
| 35 | IB Message Node |
| 36 | Message Channel/Queue |
| 37 | IB Message |
| 38 | Approval Rule Set |
| 39 | Unknown: Relates to IB |
| 40 | Subscription PeopleCode |
| 41 | Unknown |
| 42 | Component Interface Method |
| 43 | Application Engine PeopleCode |
| 44 | Page PeopleCode |
| 45 | Page Field PeopleCode |
| 46 | Component PeopleCode |
| 47 | Component Record PeopleCode |
| 48 | Component Record Field PeopleCode |
| 49 | Image |
| 50 | Portal Style Sheet |
| 51 | HTML |
| 52 | Not User |
| 53 | Permission List |
| 54 | Portal Definition |
| 55 | Portal Registry Definition |
| 56 | URL Definitions |
| 57 | Application Package |
| 58 | Application Package Peoplecode |
| 59 | ortal Registry User Homepage |
| 60 | Problem Type |
| 61 | Archive Templates |
| 62 | XLST |
| 63 | Portal Registry User Favorite |
| 64 | Mobile Page |
| 65 | Relationships |
| 66 | Component Interface Property Peoplecode |
| 67 | Optimization Models |
| 68 | File References |
| 69 | File Type Codes |
| 70 | Archive Object Definitions |
| 71 | Archive Templates (Type 2) |
| 72 | Diagnostic Plug In |
| 73 | Analytic Model |
| 79 | Service |
| 80 | Service Operation |
| 81 | Service Operation Handler |
| 82 | Service Operation Versions |
| 83 | Service Operation Routing |
| 85 | XMLP Template Definition |
| 86 | XMLP Report Definition |
| 87 | XMLP File Definition |
| 88 | XMLP Data Source Definition |
| 89 | WSDL |
| 90 | Message Version |
| 255 | Project |
Control the Popup Data on MouseOver
This is a followup post on the previous post on Mouse Over Popup.
This page also gives you the option for controlling the fields on the pop up. The setup is divided into two columns.
You can either select the employee photo or the fields in the first columns. Not both. Second column only deals with the fields.
And field level setup helps to improve the field display with the type or icon.


There are around 30 delivered fields which we can use for the popup. Select/Deselect from the list for more efficient data display. 5 sample pages which can be used for re-engineering for extending the feature.
Try it out.
PeopleSoft Form and Approval Builder
I have tried out this feature on 9.1 and thought of trying it out in 9.2. I couldn't find much changes from the previous version though.
You can find the link to the Forms under: Enterprise Components > Forms
The main advantage of the Forms are that, you can create it very easily for a less complex approval processing. A functional consultant can create a great looking online form in few minutes. This reminded me of Google Docs. The plus part of the PeopleSoft Form is that, from my perspective, is the Approval and CI integration options. It is a good option indeed.
Prior to creating the form, if you have an idea on the required prompt tables, you can create it under Define Prompt Record and keep it ready.

Start with designing the form from the Design a form page.

Provide a desired name and kick off the design.

Until the design is finished and the form is activated, the status will be In Design status. Effective date range decides the life span of the form.


You can go for a single column style or two column style. Decide and pick up the field positions. Also the fields can be moved up and down in the position by clicking the arrow marks to the right side of the scroll.

Supporting documents can be attached at this page, which will be visible to the participants

You can publish the form at any portal level. For the testing purpose, this form was registered under the Root folder.

Lock or make it available once the approval cycle is completed. You can see the Approver User List prompt in this page. This will include your form to any AWE approver user list. Pretty good right.

Preview the from from here, and make the changes to the form, before activating it.


As this form is registered under the Root folder, you can see that to the end of the Menu.

The above screenshot shows the approver to which the form is send.

If there is a from in your queue, handle it from here.

Ah, the interesting part for a developer.

As told earlier, this will be handy in situation when there is a straight forward requirement for a simple form. You cannot have event based codes written anywhere. Not in our hand. I believe people count this as the primary disadvantage, which we cannot really call as one, when considering the situations for which this is built.
Subscribe to:
Posts (Atom)