Search This Blog

Monday, December 2, 2013

PeopleSoft Campus Mobile From Oracle

Now there's a lot of buzz around Oracle's Mobile Solution. Even you might have already tried out this solution.

http://bloggingaboutoracle.com/peoplesoft-campus-self-service-mobile/ is one blog which gives you a good info on installing the mobility.

Monday, November 25, 2013

Convert Tab file to CSV and Load

Just a tip for the day.

If you got a tab limited file and want to read it as a CSV file, using the file layout, use the below code snippet.

Local File &TABFILE, &CSVFILE;
Local string &FILE_NAME, &DATA, &NEWDATA;

&FILE_NAME = "Test.txt";
&TAB = Char(9);

&TABFILE = GetFile(&FILE_NAME, "r");
&FileName = &TABFILE.Name;
&POS = Find(".", &FileName);
&NEWFILE_NAME = Substring(&FileName, 1, &POS) | "dat";
&CSVFILE = GetFile(&NEWFILE_NAME, "N", %FilePath_Absolute);
If &TABFILE.IsOpen And
      &CSVFILE.IsOpen Then
   While &TABFILE.ReadLine(&DATA);
      &NEWDATA = Substitute(&DATA, &TAB, ",");
      &CSVFILE.WriteLine(&NEWDATA);
   End-While;
   &TABFILE.Close();
   &CSVFILE.Close();
End-If;

Will be handy...

Thursday, September 5, 2013

Custom Email Templates: Tip

You might have had requirements where you have to build a configurable email page for messaging purpose. People use several ways to accomplish  this requirement. Message Catalog, Custom page/component are couple of ways to get around this requirement.

Many might have used Generic Templates for this purpose. For those who haven't, you can try this tip.

Generic Templates are basically for the work flow purpose. You can find this under:
Set Up HCM > Common Definitions > Approvals > Generic Templates

You can extend this feature for your custom email functions.

WL_TEMPLATE_GEN is the underlying record for Generic Templates. When you create templates, you will use %numbers for tagging various parameters in workflow.

Generic Template Page Sample
Corresponding DB data

These parameters can be substituted in PeopleCode to extend the Generic Templates usability in custom messaging requirements.

Say for example:
&Message = Substitute(&Body, "%5", &Descr); 

Here we replace %4 with the respective description.

And you have the easiness of using a dynamic email template without creating a dedicated page/component.

This will come handy for sure.

Wednesday, July 31, 2013

Mark the completed Worklist Entry

Below is an example code is to mark the Worklist Entry as completed once the corresponding request is approved. 

import PT_WF_WORKLIST:*;
Local WorklistEntry &worklist;

&worklist = create WorklistEntry();
&worklist.busprocname = "Administer Workflow";
&worklist.busactivity = "Send Note";
&worklist.buseventname = "Worklist Note";
&worklist.worklistname = "Worklist Note";
&worklist.instanceid = 2;

&ret = &worklist.SelectByKey();
&worklist.inststatus = "2"; /* mark entry worked */
If (&worklist.Update() <> 0) Then
   If (&worklist.Save() <> 0) Then
      /* success */
   Else
      /* handle error */
   End-If;
Else
   /* handle error */
End-If;

The other values for inststatus are given below. This property is read-write:

0: New worklist entry
1: Selected worklist entry
2: Worked worklist entry
3: Cancel string

Saturday, July 27, 2013

Not able to change the Label in Application Designer?

Follow the steps below to resolve the issue.

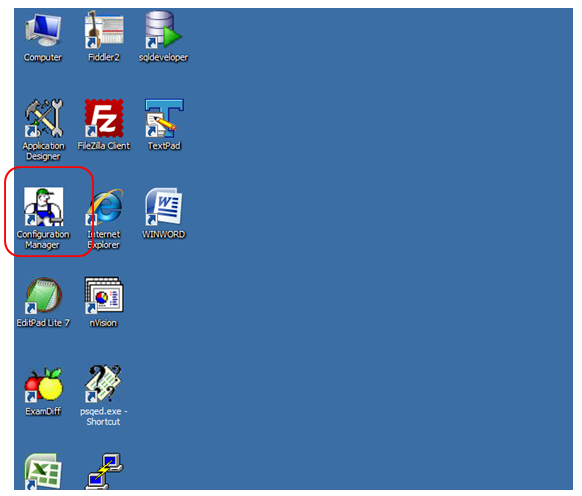
Launch the Configuration Manager:


Go to the Client Setup tab:


Check the Application Designer, CM, Data Mover, Install Workstation check boxes and click on the apply button.


Now, restart the application designer and you will be able to change the label.

Tuesday, July 23, 2013

Track the Locked Objects in Application Designer

There will be scenarios when you forget to unlock a locked object in the Application Designer, which can create unwanted confusions within the team.

The ultra simple SQL below will help to identify and resolve that issue part. The query gives the details about the locked objects in the application designer by a User ID. 

SELECT * FROM PSCHGCTLLOCK WHERE OPRID='USERID'

The object type value can be referenced to the table below.

Object Type ID PeopleSoft Object
0 Record
1 Index
2 Field
3 Field Format
4 Translate Value
5 Panel/Page
6 Menu
7 Panel Group/Component
8 Record PeopleCode
9 Menu Item
10 Query
12 Tree
13 Access Group
14 Color
15 Style
16 Not Used
17 Business Process Definition
18 Workflow Activity
19 Security Role
20 Process Definition
21 Process Scheduler Server Definition
22 Process Type
23 Job
24 Job schedule
25 Message Catalog Definition
26 Dimension
27 Cube Definition
28 Cube Instance Definition
29 Business Interlink
30 SQL Definition
31 File Layout Definition
32 Component Interface
33 Application Engine Program
34 Application Engine Sections
35 IB Message Node
36 Message Channel/Queue
37 IB Message
38 Approval Rule Set
39 Unknown: Relates to IB
40 Subscription PeopleCode
41 Unknown
42 Component Interface Method
43 Application Engine PeopleCode
44 Page PeopleCode
45 Page Field PeopleCode
46 Component PeopleCode
47 Component Record PeopleCode
48 Component Record Field PeopleCode
49 Image
50 Portal Style Sheet
51 HTML
52 Not User
53 Permission List
54 Portal Definition
55 Portal Registry Definition
56 URL Definitions
57 Application Package
58 Application Package Peoplecode
59 ortal Registry User Homepage
60 Problem Type
61 Archive Templates
62 XLST
63 Portal Registry User Favorite
64 Mobile Page
65 Relationships
66 Component Interface Property Peoplecode
67 Optimization Models
68 File References
69 File Type Codes
70 Archive Object Definitions
71 Archive Templates (Type 2)
72 Diagnostic Plug In
73 Analytic Model
79 Service
80 Service Operation
81 Service Operation Handler
82 Service Operation Versions
83 Service Operation Routing
85 XMLP Template Definition
86 XMLP Report Definition
87 XMLP File Definition
88 XMLP Data Source Definition
89 WSDL
90 Message Version
255 Project

Monday, July 8, 2013

Control the Popup Data on MouseOver

This is a followup post on the previous post on Mouse Over Popup

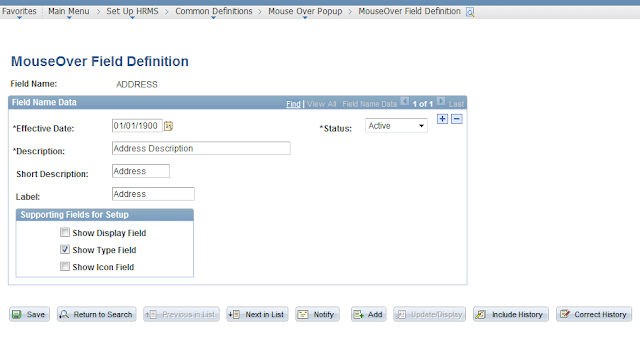
This page also gives you the option for controlling the fields on the pop up. The setup is divided into two columns. 

You can either select the employee photo or the fields in the first columns. Not both. Second column only deals with the fields.

And field level setup helps to improve the field display with the type or icon.


There are around 30 delivered fields which we can use for the popup. Select/Deselect from the list for more efficient data display. 5 sample pages which can be used for re-engineering for extending the feature. 

Try it out.

Wednesday, July 3, 2013

PeopleSoft Form and Approval Builder

I have tried out this feature on 9.1 and thought of trying it out in 9.2. I couldn't find much changes from the previous version though. 

You can find the link to the Forms under: Enterprise Components > Forms

The main advantage of the Forms are that, you can create it very easily for a less complex approval processing. A functional consultant can create a great looking online form in few minutes. This reminded me of Google Docs. The plus part of the PeopleSoft Form is that, from my perspective, is the Approval and CI integration options. It is a good option indeed.

Prior to creating the form, if you have an idea on the required prompt tables, you can create it under Define Prompt Record and keep it ready.


Start with designing the form from the Design a form page.


Provide a desired name and kick off the design.


Until the design is finished and the form is activated, the status will be In Design status. Effective date range decides the life span of the form.


You can go for a single column style or two column style. Decide and pick up the field positions. Also the fields can be moved up and down in the position by clicking the arrow marks to the right side of the scroll.


Supporting documents can be attached at this page, which will be visible to the participants


You can publish the form at any portal level. For the testing purpose, this form was registered under the Root folder.


Lock or make it available once the approval cycle is completed. You can see the Approver User List prompt in this page. This will include your form to any AWE approver user list. Pretty good right.


Preview the from from here, and make the changes to the form, before activating it.


As this form is registered under the Root folder, you can see that to the end of the Menu. 


The above screenshot shows the approver to which the form is send.


If there is a from in your queue, handle it from here.


Ah, the interesting part for a developer.


As told earlier, this will be handy in situation when there is a straight forward requirement for a simple form. You cannot have event based codes written anywhere. Not in our hand. I believe people count this as the primary disadvantage, which we cannot really call as one, when considering the situations for which this is built.

Monday, July 1, 2013

Report Distribution Using AddDistributionOption

In my previous post on Report Distribution Using XML Publisher - Right Report To The Right Person, we have seen how to distribute the report to the right person, without any coding efforts. Because we have that feature pre-built in XML Publisher. 

What if, when SQR process comes with a similar requirement?

This can be achieved by the AddDistributionOption, from the CreateProcessRequest family.

A small trick has to be implemented to launch n number of process request based on the parameters. 

&RQST.AddDistributionOption("User", "Your User ID"); will take care of distributing the reports from there, based on the User ID fed into it.

You can use this approach for the XML Publisher and nVision reports too.

Like we have an alternate way in XML Publisher, there is a way to do the same in nVision. However, I did not get a chance to try out the same.

If anyone has done it before, feel free to share the tip here.

Wednesday, June 19, 2013

Report Distribution Using XML Publisher - Right Report To The Right Person

Consider the situation where you have to run certain report, which is keyed by the Business Unit and Company. Once the report is run using a job using a batch user id, the report should go to the CEO of the Company and Business Unit combination. 

The above requirement can be achieved as below through an XML Publisher report.

You might know the bursting feature in XML Publisher, which will help you to slice the report based on a field. As the first step, to extend this functionality, I added another Colum (say BU_COMP_MIX) to the report staging table which is a concatenated of the BU and Company. And burst the report on this field. Make Sense?

Now you have to create a view with the CEO details for a Company and Business Unit combination along with the BU_COMP_MIX field. I name the view as AN_CEO_DET_VW. Three fields, with the values fetched from the data sources you have.

Navigate to the Report Definition page: Reporting Tools > XML Publisher > Report Definition

And follow the steps in the below screen shot.

Now try running the report and login as the respective CEO's and verify the report receipt in the Report Manager.

To make the CEO's to view only their own reports, you have to disable the User ID search in the Report Manager page. That can be done by removing the report distribution role from the user profiles.

The above tip might look simple in technical perspective but not in the business view. This matters a LOT!

Tuesday, June 18, 2013

Component missing from MouseOver Popup Setup. Contact Your System Administrator.

While creating a new component from the copy of several delivered pages, you might see this error on the MouseOver Popup feature.

"Component missing from MouseOver Popup Setup. Contact Your System Administrator."

The solution is simple. You can get there easily, if you are in the mid of a development. However, this error can kill your time, during an upgrade, making you read the related App Package codes and to figure out how my component got missed from the setup.


Solution: There is a setup for MouseOver Popup in 8.52, where you have to authorize a component (mainly happens with the custom ones), for the MouseOver feature.

The setup is under: Set Up HRMS > Common Definitions > Mouse Over PopUp > MouseOver Component Setup.

Provide the component name and the Person Detail view and you are done with the component setup for MouseOver Popup.


And the popup will work as expected.

Thursday, June 13, 2013

Multiple Reports in SQR at ease

You can print multiple reports with ease using the simple structure below. 

DECLARE-REPORT can declare n number of reports (max 99) and use it for the respective printing. There is catch at this point. What if the reports are dynamic and you cannot forcast the number of reports that gets generated.

Then the below code can be handy.

You have the while loop and NEW-REPORT part inside it. Make the file name dynamic based on the variables in your code. And that's it. 

No headaches of declaring multiple reports in the begin-setup and you can get n number of reports (max infinity), without the limitation of 99.

Hope, this will be a handy code for you.

Friday, June 7, 2013

XML Publisher - Clean Up

Cleaning Up BI Publisher Metadata

Some people are very specific about the way the data is managed in the system. I have seen several Admins who is very serious about the accurate data in the system, they will always clean up the data in the system, like the perfect housewives maintains a good home. 

In BI Publisher we have a delivered way to do this act. The Application Engine program name is PSXPCLEAN. It tracks and manages the orphaned objects in the system and provides you a report too.

What the different sections does in the AE. It find outs the orphaned definitions to the state record and deletes it in a sequence.

Various sections performs this duty.


This application engine program is delivered in Report and Delete mode. To run the program in Report Only mode, open the application engine program PSXPCLEAN in Application Designer and remove the comment in the following statement in PSXPCLEAN:Main:Start PeopleCode action:

rem PSXPFILECLN_AET.REPORT_ONLY_FLAG = "Y" (which is marked in Yellow below)


From here, the AE starts collecting the info about the missing definitions.


From this point the clean up starts.


A handy tip to know about the AE and the main tables in XMP Publisher for quick reference.