Search This Blog

Friday, October 30, 2009

Creating a csv Report

Use the code as a frame work and do your own enhancements for creating a simple csv report.

&NewDirectory = " C:\temp\folder ";

CreateDirectory(&NewDirectory, %FilePath_Absolute);

& file = GetFile("C:\temp\folder\reportname.csv", "W", %FilePath_Absolute);

& file.WriteLine(",,,Heading of the File);

& file.WriteLine("");

&file.WriteLine(" File titles separated by commas");

Sql=Create sql();

While sql.fetch()

&file.WriteLine(Pass the variable container in a loop in case of multiple rows);

End-while;

Job Data Component Interface

The most used CI's for Job data creation and updation are job data Ci,job data employee CI, job data contigent worker CI and job data person of interest Ci. if a new person is hired we will go for job data employee Ci. if a contract worker is recruited we use job data contigent worker Ci. That is the distinction here. Consider in case of a rehire situation. Then we use job data component for updation. A new record cannot be created using this CI. That has to be done by the job data emp and job data cwr CI's.

One point to keep in mind here is the action and reason while updating the exisitng data.


DOMODAL

The DoModal function displays a secondary page. Secondary pages are modal, meaning that the user must dismiss the secondary page before continuing work in the page from which the secondary page was called.

Syntax

DoModal(PAGE.pagename, title, xpos, ypos, [level, scrollpath, target_row])

Any variable declared as a Component variable will still be defined after using a DoModal function.

DoModal should not be used in the following peoplecode events:

Saveprechange

Savepostchange

Workflow

Rowselect

Any PeopleCode event that fires as a result of a ScrollSelect, ScrollSelectNew, RowScrollSelect or RowScrollSelectNew function call.


Returns

Returns a number that indicates how the secondary page was terminated. A secondary page can be terminated by the user clicking a built-in OK or Cancel button, or by a call to the EndModal function in a PeopleCode program. In either case, the return value of DoModal is one of the following:

  • 1 if the user clicked OK in the secondary page, or if 1 was passed in the EndModal function call that terminated the secondary page.
  • 0 if the user clicked Cancel in the secondary page, or if 0 was passed in the EndModal function call that terminated the secondary page.

Example :

DoModal(PAGE.EDUCATION_DTL, MsgGetText(1000, 167, "EducationDetails - %1", EDUCATN.DEGREE), - 1, - 1, 1, RECORD.EDUCATN, CurrentRowNumber());


EndModal :

The EndModal function closes a currently open secondary page. It is required only for secondary pages that do not have OK and Cancel buttons. If the secondary page has OK and Cancel buttons, then the function for exiting the page is built in and no PeopleCode is required.


Example :

The following statement acts as an OK button:

EndModal(1);

The following statement acts as a Cancel button:

EndModal(0);

IsModal :

IsModal returns True if executed from PeopleCode running in a modal secondary page and False if executed elsewhere. This function is useful in separating secondary page-specific logic from general PeopleCode logic.


Example


If Not IsModal() Or
      Not (%Page = PAGE.PAY_OL_REV_RUNCTL Or  %Page = PAGE.PAY_OL_RE_ASSGN_C Or %Page = PAGE.PAY_OL_RE_ASSGN_S) Then


   Evaluate COUNTRY
   When = "USA"
   When = "CAN"
      If Not AllOrNone(ADDRESS1, CITY, STATE) Then
         Warning MsgGet(1000, 5,"Address should consist of at least Street (Line 1), City, State, and Country.")
      End-If;
      Break;


   When-Other;
      If Not AllOrNone(ADDRESS1, CITY, COUNTRY) Then
         Warning MsgGet(1000, 6, "Address should consist of at least Street (Line 1), City, and Country.")
      End-If;
   End-Evaluate;
End-If;

Creating Tabbed Grid:

PeopleSoft recommends using a tabbed grid design if your grid contains many columns running off the right side of the page. Do this by adding tab separator controls to your grid.

Example :


Tabbed grid

You can give users the option of expanding all of the columns to the right so they are visible when using the browser's horizontal scroll bar. This is particularly useful to power-users who do a great deal of intensive data entry. The Enable View All Columns check box on the Use tab in the Grid Properties dialog box controls this feature and is selected by default. The Expand All button appears to the right of the grid tabs, as shown in the preceding screen shot. After the grid is expanded, the Show Tabs button appears to enable the user to collapse the grid so that the tabs appear again.

Steps Required to Create a Tabbed Grid :

  1. Insert a grid control on the page.
  2. Insert the columns to appear on the first tab.
  3. Insert a tab separator control after the last column.
  4. Set the tab separator properties.
    1. Double-click on the tab separator to access the Tab Separator Properties dialog box.
    2. Specify the label properties on the Label tab.
    3. Specify the general properties on the General tab.
  5. Insert the next set of columns to appear on the second tab.

    Alternatively, you can place all of the columns in your grid first and then insert the tab separator between the two columns that you want separated.

  6. Repeat steps 3 and 4 if necessary.
  7. Set the tab separator properties by double-clicking the column heading of the tab separator.
  • On the Label tab, specify the label type.

    Select None, Text, or Message Catalog. If you select Text, enter the label text and select the label alignment. The label text that you select appears on the tab in the grid.

  • On the General tab, determine whether you want to enable the tab separator as a page anchor.

    If so, select the Enable as Page Anchor check box and enter a page field name.

Freezing Grid Columns :

You can freeze the first column or the first several columns in a tabbed grid so that they appear on subsequent tabs. To freeze more than one column, select the freeze option for each column that you want to appear on the following tab.

Using Multiple Grids in a Page :

You can place as many grids on a page as you like, provided that they are at the same occurs level. They can be one above the other or they can be side-by-side. This is helpful when you must transfer data from one grid to another without switching between pages.


Creating and calling functions

  • Function test() is getting called from the field change.

Declare Function test PeopleCode (destination field) FieldFormula;

test();

  • Now under the (destination field) FieldFormula

Write the code below to call the function

Function test();

/*******Do the processing here like call application engine, create process request etc*******/

End-Function;

Populate Data on a button click

The code below will show you how to populate data to a grid using the parameters entered in the same page. Initially the grid will be invisible. That is the best practice.

Global any &count;

Local Rowset &rs0, &rs1;

Local Row &row0, &row1;

Local any &I = 1;

&count = 0;

rem HideScroll(Record.Record Name);

If &count > 0 Then

   UnhideScroll(Record.Record Name);

   &rs0 = GetLevel0();

   &row0 = &rs0(1);

   &rs1 = &row0.GetRowset(Scroll.Record Name);

   &rs1.Flush();

   &SQL1 = CreateSQL("                        );

   While &SQL1.Fetch(   &ex1,&ex2)                             )

      &rs1.InsertRow(&I);

      &row1 = &rs1(&I);

      &row1.field1.Value &ex1;

      &row1.field2.Value = &ex2;

       &I = &I + 1;

      End-While;

   &rs1.DeleteRow(&I);

   Else

   WinMessage("There are no records  for this  search criteria", 0);

End-If;

Happy Learning !

Creating the CI in easier way and Save the development time

Below are the CI codes manually written without dragging and dropping it. This will help to save the time for developing a CI using peoplecode. What we need to know is the placement of fields in the collection. For example , if the field is in the second collection, access the second collection through the first collection and get the field. Similar to accessing the field in a scroll.

Below is the code for creating a Personal Data CI:

&MYSESSION = %Session;

      &MYCI = &MYSESSION.GetCompIntfc(CompIntfc.CI_PERSONAL_DATA);

      &MYCI.GETHISTORYITEMS = True;

      &MYCI.EDITHISTORYITEMS = True;

      &MYCI.INTERACTIVEMODE = True;

      &MYCI.KEYPROP_EMPLID = "NEW";

      &MYCI.CREATE();

      &MYCI.PROP_BIRTHDATE = &BIRTHDATE;

      &MYCI.PROP_DERIVED_EMP = &EMP;

      &MYCI.PROP_DERIVED_CWR = &CWR;

      &NAME_1 = &MYCI.COLL_NAME_TYPE_VW;

        &LEVEL1_NAME = &NAME_1.item(1);

      &LEVEL1_NAME.KEYPROP_NAME_TYPE = "";

      &NAME_2 = &LEVEL1_NAME.COLL_NAMES;

      &LEVEL1_NAME = &NAME_2.item(1);

      &LEVEL1_NAME.PROP_FIRST_NAME = &FIRST;

      &LEVEL1_NAME.PROP_MIDDLE_NAME = &MIDDLE;

      &LEVEL1_NAME.PROP_LAST_NAME = &LAST;

      &EMPLID_NEW = &MYCI.KEYPROP_EMPLID;

      &MYCI.Save();


      If Not &MYCI.Save() Then;

/******Do the processing here*****/

      End-If;

      If &MYCI.Save() Then;

         /****Do the processing here******/

         End-If;

Below is the code for Inserting a new row into the record using CI

&MYJOBSESSION = %Session;

      &MYJOBCI = &MYJOBSESSION.GetCompIntfc(CompIntfc.CI_JOB_DATA_EMP);

      &MYJOBCI.GETHISTORYITEMS = True;

      &MYJOBCI.EDITHISTORYITEMS = True;

      &MYJOBCI.INTERACTIVEMODE = True;


      &MYJOBCI.KEYPROP_EMPLID = give emplid;

     &MYJOBCI.KEYPROP_EMPL_RCD = 0;

      &MYJOBCI.CREATE();


      &JOBCOLL = &MYJOBCI.COLL_JOB;

      &LEVEL1_JOB = &JOBCOLL.item(1);


      &LEVEL1_JOB.PROP_BUSINESS_UNIT = &BU;

      &LEVEL1_JOB.PROP_JOBCODE = &JOBCODE;

      &LEVEL1_JOB.PROP_COMPANY = ∁

      &LEVEL1_JOB.PROP_DEPTID = &DEPT;

      &LEVEL1_JOB.PROP_LOCATION = &LOC;

      &LEVEL1_JOB.PROP_SUPERVISOR_ID = &SUPERID;


      &MYJOBCI.Save();


      If Not &MYJOBCI.Save() Then;

/*****Do error processing here*********/

      End-If;

      If &MYJOBCI.Save() Then;

/*****Do error processing here*********/

      End-If;

Save the development time and get to know your CI better.

Happy Learning!

Monday, October 26, 2009

Changing the Order of fields in a CI

I read about changing the sequence of the fields in a component interface without using people code. The possible way was to import the CI whose field sequence to be changed as a XML file. Swap the sequence numbers in the XML file and export back. So the purpose is done. That’s really a cool one right ?

Thursday, October 22, 2009

Query Drilling URL Feature in People Tools 8.50

I was searching for new features available in PeopleSoft 8.50 and landed at Gray Sparling solutions blog. Larry Gray has one post on Query Drilling URL Feature in People Tools 8.5

Benefits of this feature in PeopleTools 8.5

Although it was possible to embed drilling hyperlinks in to queries since PeopleTools 8.45, there were several limitations in how it was accomplished that made it difficult to design, manage, support, and even use.

·         Because the only way it knew whether to turn data into a hyperlink was to evaluate the HTTP: at the beginning of the data returned from query column, references were hard-coded to a specific environment (meaning you have to fix the URI when moving between environments)

·         The syntax for embedding references to pages, queries, and references to data to pass into the pages or queries was very cumbersome and depending on the platform, required knowledge of both trimming data and concatenating syntax.

·         You could not attach a drilling link to data in the query. In other words, you have to display the drilling link in the result set (often a very large string) as its own entity. Ideally, you would like to be able to click on an EMPLID or DEPTID and drill to data for either of those

Fortunately, the features in PeopleTools 8.5 address these limitations


·         The expression object in Query is extended with a new expression type called Drilling URL. Because it is a special type of expression, Query knows to turn it into a hyperlink regardless of the data in it.

·         It supports relative references that begin at the content type (Query, Component, or External). This means that queries moved between environments do not need to be modified to fix URI values

·         It allows linkage between bind values and data in the query easily without requiring meta-sql or other advanced SQL syntax

·         It allows specifying which fields the URL should be attached to. This means that your queries look a lot better and are much more usable. These links are also embedded in all output types of query.


Read and Learn about this feature from Gray Sparling Blog

Wednesday, October 21, 2009

AJAX with PeopleCode

AJAX - Asynchronous JavaScript And XML


AJAX is a group of interrelated web development techniques used on the client-side to create interactive web applications or rich Internet applications. With Ajax, web applications can retrieve data from the server asynchronously in the background without interfering with the display and behavior of the existing page.
The use of Ajax with Peoplesoft has led to an increase in interactive or dynamic interfaces on web pages and better quality of Web services due to the asynchronous mode.


Very few sites help us how to Integrate Peoplesoft and AJAX. Here is the basic code how to start…

1) Download the jquery Ajax library and put it in a publicly accessible folder on your web server
http://docs.jquery.com/Downloading_jQuery
Place the jquery.js file in Webserver
(...peoplesoft/applications/peoplesoft/PORTAL/scripts)


2) Let us test how Ajax works,with this basic example:
Add an html file to your web server root named "ajax.html" with the content:
Ajax- Working Fine &ltbr/&gt
Greetings from Peoplesoft! &lt/b&gt

3) Now, add the Ajax library to a PeopleSoft page. To do this, add an HTML area to a page. Double-click the HTML area to set the content to static with the following content:

&lt script type="text/javascript" language="javascript" src="http://server/ name:9057/PORTAL/script/jquery.js" &gt

$(document).ready(function(){ $("#ajaxcontent").load("http://server/ name:9057/DOMAIN/script/ajax.html", null, function() { $("#ajaxcontent").fadeIn("fast"); });});

&lt/script&gt&ltdiv id="ajaxcontent" style="display: none;"&gt

&lt!-- comment to keep PS from removing this empty div -->&lt/div&gt

Reload your customized page in your browser. If you see your HTML file's contents appear after the page loads, then you have Ajax working properly.

PsoftAdmirer

Thursday, October 15, 2009

Excel Datasources

We have been getting requests asking if we can handle an Excel file as a datasource for a report. I guess the business case is that users maintain and enter new data using Excel spreadsheets and need the entered to support a report for management.


With the BIP Server you could have done it with the JDBC-ODBC bridge or maybe a conversion to a CSV format and then load to a db ... both work but are fiddly to setup and maintain. With the 10.1.3.2, R12 and 5.6.3 for 11i releases there are a set of java APIs that can be used to access and read binary Excel files generating XML data. I have to admit these are somewhat hidden APIs; they will be the basis of our Excel template strategy when they arrive later this year. For now this entry will serve as the documentation for the APIs. ... apologies.


In this article I'll cover the use of the Excel2Data API, this is used to read data from the Excel file and generate XML output. I have mounted the javadoc here. The simplest implementation would be:

public class Excel2XML {
    public Excel2XML() {
       String inExcel = "d://temp//excel//1.xls";
       String outFile = "d://temp//excel//1.xml";
        Properties prop = new Properties();
        prop.setProperty("system-temp-dir", "d://temp//excel//tmp");
       
        Excel2Data xls2Data = new Excel2Data();
        xls2Data.setOutputType(Excel2Data.OUTPUT_TYPE_XML);
        xls2Data.setConfig(prop);
         try
         {
            xls2Data.loadExcel(inExcel);
            xls2Data.generate(outFile);
         }
         catch (IOException exc)
         {
            exc.printStackTrace();
         }
         catch (XDOException e)
         {
            e.printStackTrace();     
         }
        }
    public static void main(String[] args) {
        Excel2XML excel2XML = new Excel2XML();
    }
}

inExcel - can be an InputStream or a File location
outFile - can be an OutputStream or File location
system-temp-dir - this is a temporary working directory that the API needs to work in and must be set.
output format - the only other unknown for you should be the output type ie Excel2Data.XXXXX. This can take one of three values, two are XML formats and the third a CSV format:

OUTPUT_TYPE_XML  - generates the following format of XML. This format will work with any Excel format. Its a standard XML format i.e. no matter what Excel you use the XML format will remain the same.

<workbook>
  <sheet>
    <name>Sheet1</name>
    <row number='0'>
      <column number='0'>Employee Listing</column>
    </row>
    <row number='2'>
      <column number='0'>Name</column>
      <column number='1'>Title</column>
      <column number='2'>Salary</column>
    </row>
    <row number='3'>
      <column number='0'>Jones</column>
      <column number='1'>Managing Director</column>
      <column number='2'>60000.0</column>
    </row>
</workbook>


OUTPUT_TYPE_XDOXML  - this format can only be generated if you use named cells. This is the basis of the coming Excel templates. Its structure is completely dependent on the data.

<XDOROOT>
  <EMPLOYEE>
    <NAME>Jones</NAME>
    <TITLE>Managing Director</TITLE>
    <SALARY>60000.0</SALARY>
  </EMPLOYEE>
</XDOROOT>


OUTPUT_TYPE_CSV - this, if you ever need it generates a comma delimited file output.

Sheet1
"Employee Listing"
"Name","Title","Salary"
"Jones","Managing Director",60000


Great so now you can get data XML from a binary Excel file. You can get the sample file and java class here. How can I use the API in a real scenario I hear you ask?


Well, you now know how to use the API so you could create a java class to do the conversion and then feed that to the formatting API, FOProcessor. What would be way more cool and useful would be to allow the BIP Server to fetch the data from the Excel at runtime, so you could set up Excel datasources so that report consumers could get a snap shot of data from the Excel files at will.
Tune in tomorrow to see how that can be done ... sorry gotta dangle that carrot so you come back for more.

Monday, October 12, 2009

Is MessageBox a Think-Time Function?

Think-time functions are PeopleCode functions that suspend PeopleSoft processing to wait for an external event (user input, an external process to complete etc). PeopleBooks strongly recommends not using think-time functions in certain PeopleCode events.

However, what category does MessageBox fall into? Well according to PeopleBooks:

If the style parameter specifies more than one button, the function behaves as a think-time function and is subject to the same restrictions as other think-time functions.

In other words, MessageBox is not a think time function when the style parameter only specifies one button! This can only be the case when the style parameter is 0 or %MsgStyle_OK which means only show the OK button. So if you use 0 or %MsgStyle_OK as the style parameter, you can use MessageBox as a normal function in any relevant PeopleCode event.

Find Unused Permission Lists

This query should find unused permission lists that could be deleted.

SELECT * FROM PSCLASSDEFN A
WHERE NOT EXISTS ( SELECT 'X' FROM PSUSERCLASSVW B WHERE A.CLASSID = B.CLASSID )
AND NOT EXISTS (SELECT 'X' FROM PSOPRDEFN B WHERE A.CLASSID = B.OPRCLASS)
AND NOT EXISTS (SELECT 'X' FROM PSOPRDEFN B WHERE A.CLASSID = B.PRCSPRFLCLS)
AND NOT EXISTS (SELECT 'X' FROM PSOPRDEFN B WHERE A.CLASSID = B.DEFAULTNAVHP)
AND NOT EXISTS (SELECT 'X' FROM PSOPRDEFN B WHERE A.CLASSID = B.ROWSECCLASS)
AND A.LASTUPDOPRID <> 'PPLSOFT'
ORDER BY CLASSID ;

To Find Missing Component Interfaces for user

This sql should find component interfaces that a specific user does not have.

SELECT A.BCNAME,
  A.BCDISPLAYNAME,
A.MENUNAME ,A.DESCR, A.DESCRLONG
      FROM
PSBCDEFN A WHERE
NOT EXISTS (SELECT B.CLASSID FROM
PS_PSBCDEFN_VW B, PSOPRCLS C WHERE
B.BCNAME = A.BCNAME AND
C.OPRCLASS = B.CLASSID
AND C.OPRID = 'UserID' )
ORDER BY A.BCNAME;

To enable CREF to Open in a New Window

Here is a quick tip to make a portal Content Reference (CREF) open in a new window. 

This might be used for linking to an external or intranet site that is not part of Peopletools.  

You just need to add a Content Reference Attribute of "NAVNEWWIN" = true

Create Excel Files in SQR and PeopleCode

I recently stumbled upon an Open Source project on Source Forge that allows you to create Microsoft Excel Workbooks with multiple sheets, advanced formatting and formulas.

If you are not a reporting guru then you are not aware that PeopleCode cannot create an excel file. The only alternative is to create a comma separate file and have the user import that into Excel.

In SQR, you can run the report to an Excel format starting in release 8.0. However, you have very little control over the formatting and you cannot have formulas. SQR basically creates a native SPF file and then calls some libraries to convert that file to excel format (or PDF, CSV, HTML). 

This was written for both SQR and PeopleCode. The PeopleCode version is implemented as an iScript with the intention of pushing a file down to the browser and having the user’s workstation open excel. With some rework of the PeopleCode, you can have your application engines creating rich excel report with formatting.

There are some limitations to this project. Your users have to be running a minimum of Office XP. The code actually creates an XML file in the Office format. If you did not know this was possible, do a “save as” on an excel document and notice you can save the spreadsheet as an “XML Spreadsheet”. I am sure this took some time to develop as I have looked at the [1] Microsoft Office XML Specification and it is pretty large.

You can check the project out at the following link:  SQR2XML Project

Integration Broker Monitor

I find that users are often confused about how to look at the message monitor to determine if there are errors. 

The most common mistake is when a user just looks at one of the three message queues and ignores the rest. They may just look at the “Operation queue” or just the “publication queue” when in fact you need to look at the Operation, Publication, and Subscription queues to make sure they are all clear of errors.

I put together the following screenshot that I hope will help people understand how to properly look at the message monitor to see if there are any errors and see if all the messages have processed. 

Note: This is taken from an 8.49 Tools database.   There were major changes to the Integration Broker terminology starting in 8.48.  However, the concepts are really the same but the terminology has slightly changed starting in 8.48.

Overview of Integration Broker Publishing Steps


The Application Messaging / Integration Broker is a complicated PeopleSoft module and can be very confusing if you don’t know what to look for.

An application message goes from several stages in both the “publishing” system and the “subscribing” system before the integration message has completed is both publishing and subscribing systems. It also gets handed off between many different application server processes and at any point one of those processes can crash or be down and it can cause the message to not complete. This will result in passwords being out of synch for users between databases until that message can reach its destination and update the database. 

For some perspective the application message goes through these high level steps with each one being a failure point. Hopefully, this information will help when looking at the Message monitor.

Application Messaging Processing Steps 
  • A user interacting with the application changes their password which triggers some “publication” PeopleCode that creates the message. 
  • The integration broker receives the publication event and creates the message in the publishing broker. The message will now only be visible in the “Message Queue” on the message monitor. 
  • If the Message Channel Is Paused the Publication will stop here until the channel is un-paused. 
  • A second app server process wakes up and looks at the new message and determines where it needs to publish to and creates the “publication contracts.” The message contracts will now be visible in the “Publication Queue” in the message monitor. For the password synch mod, for each password change there is 3 contracts created, one for each destination database. 
  • A third process wakes up and sees the new publication contracts and processes each publication to each database separately. For example if a user changes their password in Finance, you will see in the integration broker 3 publication contracts. One for SA, Portal and CRM. 
The password at this point is still not changed in the target systems yet. If the publishing database says that the messages published you need to verify that the subscribing database had completed processing the message.

The subscribing database broker receives the published message and creates the new message instance in the integration broker. The message will now be visible in only the “Message Queue” on the subscribing message monitor. 
  • If the Message Channel is paused the process will stop here until the channel becomes un-paused. 
  • A second subscribing process wakes up and sees the new message instance and determines what subscription contracts need to be created and they get created. The message contracts will now be visible on the “Subscription Queue” on the Message Monitor. 
  • Once the subscription contracts are created another process wakes up and processes the subscription contract PeopleCode. 
  • If all of the above contracts have been processed then the message is considered” completed and both database have been updated.

Updating PS Query References in the Tools Tables

I was recently working at one of my clients on some post production upgrade support. Before their upgrade to release 8.9, they had several tables that looked like the PS_EMPLOYEES table.

These had different version of data like terminated employees and employees active as of the end of the last month. These custom tables also had custom fields from other database tables and some calculated values that PeopleSoft does not include in their table. The client wanted to simplify their environments and create one custom table called EMPLOYEES_ALL to satisfy all their needs.

This can cause issues with PS Query references and updating queries can be a very tedious task. The public queries are easy to fix because you can access them. However, the user’s private queries cannot always be accessed. But who really wants to open 500 queries individually and made the record changes? This is very error prone and mind numbing.

Since PeopleSoft queries are all stored as meta-data in Tools tables, you can theoretically update these references with SQL from the back end.

I created some scripts that changed all references to the deleted EMPLOYEE_XX records to the new EMPLOYEES_ALL reference.

Note: This was tested in an 8.9 environment on Tools 8.46. Do not take these scripts on faith. In the example scenario, the change was an easy one to one mapping between tables where all the fields that were on the old deleted record existed on the new record. If you want to use these scripts please do thorough testing in a development and test environment before running it in any production environment.

In the example below, I am doing an update on all queries that have a name like “UPG_ME”.

Note: The OPRID field on the PSQRY% records designate if the query is public or private. If the fields is blank then it is a public field.


UPDATE PSQRYRECORD SET RECNAME = 'EMPLOYEES_ALL'  WHERE QRYNAME LIKE 'UPG_ME%' AND RECNAME = 'EMPLOYEES_XX'     UPDATE PSQRYFIELD SET RECNAME = 'EMPLOYEES_ALL'  WHERE QRYNAME LIKE 'UPG_ME%' AND RECNAME = 'EMPLOYEES_XX'  

Find Tables with Specific Field Names

Have you ever wanted to find a table that had specific combination of fields on it? This is a common occurrence when looking for a run control record to use with a new process or looking for specific tables in a module you are not familiar with. A simple SQL statement can aid in this searching.

SELECT * FROM PSRECDEFN A WHERE RECTYPE = 0 AND EXISTS (SELECT 'X' FROM PSRECFIELD B WHERE A.RECNAME = B.RECNAME AND B.FIELDNAME = 'EMPLID') AND EXISTS (SELECT 'X' FROM PSRECFIELD B WHERE A.RECNAME = B.RECNAME AND B.FIELDNAME = 'LOCATION') ORDER BY RECNAME 

In this example I am searching for tables (RECTYPE = 0) that have both an EMPLID and LOCATION filed. If you have more than two fields you can add another exists clause. If you are looking for key fields you can do something similar with the PSKEYDEFN table. It defines the keys on a table.

Friday, October 9, 2009

Synchronize your book marks

Synchronize your book marks where ever you go

It's a headache for me to keep the book marks synchronized between my office computer with the home and personal laptop. Yes, I thought about making an application which store the book marks online, but not in the systems hardware.

However someone else has already thought about the same and there's xmarks.com

Xmarks is a free add-on for your browser that synchronizes and backs up your favorites across multiple computers and more

Keep your life synchronized J

Difference between different people tools versions

Difference between different people tools versions, is a general question that I always hear around.

I got these details below from the Oracle PeopleTools cumulative feature document release and thought of sharing few details here.

Application designer

Release 8.44

Spell check for labels, texts
grid generation code to generate blank, dummy rows to pad out the grid to the fixed number of rows set in the occurs count
activate or deactivate the Help and New Window links, and new settings to customize a page and copy a URL
Change Packager feature

Release 8.45

Scroll and Clip attributes have been removed
You can now add a –LF parameter to the command line for pside.exe and specify the location of a log file

Release 8.46

more robust upgrade tools, which enable you to:

Make rapid changes to environments.
Create custom code.
Upgrade applications and apply patches.
visual compare feature in PeopleSoft Application Designer enables you to view the same page definition from two different data sources
Compare Report Viewer, a client-based HTML program

Release 8.48

composite compare reports
Save As option and a Delete option when working with foreign language pages, which allow conversion to and from non-base languages
New mappings are available for PeopleSoft field types Character, Long Character, Long Character with Raw Binary, and Image Attachment.
supports the DESC clause in the CREATE INDEX DDL statement.
two new file layout options, Seg Terminator and Pad Field
PeopleCode

Release 8.44

Crypt class, universal queue classes, PrcsApi class, content reference links class, worklist class, and abstract classes.
editor has been enhanced to allow you to control how PeopleCode appears in an Application Engine program, a SQL definition, an HTML definition, or regular PeopleCode, and to control the word-wrap feature
new built-in functions and system variables have been added

Release 8.45

new functions added to PeopleCode include CopyFromJavaArray, CopyToJavaArray, TransferExact, and WriteToLog
Application classes were changed to allow you to declare protected methods and properties, and to declare a class as an Interface
New properties were added to Field Class and Java Class
Role-based security is now supported through the RolePermissions classes
new RowsetCache class was added. PeopleTools stores application data in a database cache to increase system performance. The RowsetCache class enables you to access this memory structure, created at runtime, and shared by all users.
application logging with PeopleTools

Release 8.46

Several new classes were added to PeopleCode—Analytic Calculation Engine Classes,Analytic Calculation engine Metatdata Classes, Analytic Grid Classes, Analytic TypeClasses, and Integration Broker Web Service Directory Class

Release 8.47

SendMail built-in function has been changed so that you can use double-byte characters for the display names for an email address

Release 8.48

Message classes, many changes were made to support service operations, the new events, message segments, container messages, and so on

More features related to Development Tools, Integration Tools, Analytic Tools, Administration Tools, Lifecycle Management Tools, People Books etc you can download it from support.oracle.com site.

IF you have any more specific info about the same, please post it as comments under this post

Thursday, October 8, 2009

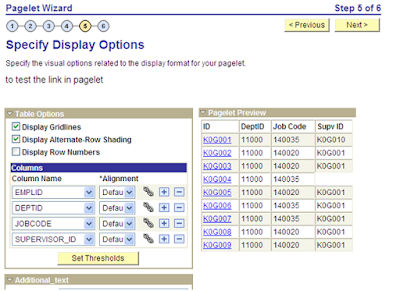
Passing parameter from pagelet


The following shows how to pass parameter from the pagelet wizard to a desired component:
When clicked on the id hyperlink the control get passed to the component which is defined in the settings. Like…

How to do that ??
Create a pagelet as shown in the first figure.
Go to the step 5


Click on the link icon against the coloum name. Here I have taken emplid for instance and do the settings in the page as shown in the screenshot below


And that’s it ! its done…And now its your turn to have the experiments to enhance the functionality.

Trunc() function

ON DATES
<pre>SQL> 
SQL> ALTER SESSION SET NLS_DATE_FORMAT = 'DD/MM/YYYY HH24:MI:SS' ; 
Session modifiée. 
SQL> 
SQL> -- Current date -- 
SQL> SELECT SYSDATE "Current date" FROM DUAL ; 
Curent date
-------------------                                                              
08/10/2004 14:08:48                                                              
SQL> 
SQL> -- date truncated to the 1st day of the year -- 
SQL> SELECT TRUNC(SYSDATE, 'YEAR') "'YEAR'" FROM DUAL; 
'YEAR'                                                                          
-------------------                                                              
01/01/2004 00:00:00                                                              
SQL> 
SQL> -- date truncated to the 1st day of the ISO year -- 
SQL> SELECT TRUNC(SYSDATE, 'IYYY') "'IYYY'" FROM DUAL; 
'IYYY'                                                                          
-------------------                                                              
29/12/2003 00:00:00                                                              
SQL> 
SQL> -- date truncated to the 1st day of the quarter -- 
SQL> SELECT TRUNC(SYSDATE, 'Q') "'Q'" FROM DUAL; 
'Q'                                                                              
-------------------                                                              
01/10/2004 00:00:00                                                              
SQL> 
SQL> -- date truncated to the 1st day of the month -- 
SQL> SELECT TRUNC(SYSDATE, 'MONTH') "'MONTH'" FROM DUAL; 
'MONTH'                                                                          
-------------------                                                              
01/10/2004 00:00:00                                                              
SQL> 
SQL> -- date truncated to the 1st day of the week -- 
SQL> SELECT TRUNC(SYSDATE, 'DAY') "'DAY'" FROM DUAL; 
'DAY'                                                                            
-------------------                                                              
04/10/2004 00:00:00                                                              
SQL> 
SQL> -- day of the week corresponding to the 1st day of the month -- 
SQL> SELECT TRUNC(SYSDATE, 'W')  "'W'" FROM DUAL; 
'W'                                                                              
-------------------                                                              
08/10/2004 00:00:00                                                              
SQL> 
SQL> -- day of the week corresponding to the 1st day of the year -- 
SQL> SELECT TRUNC(SYSDATE, 'WW')  "'WW'" FROM DUAL; 
'WW'                                                                            
-------------------                                                              
07/10/2004 00:00:00                                                              
SQL> 
SQL> -- day of the week corresponding to the 1st day of the ISO year -- 
SQL> SELECT TRUNC(SYSDATE, 'IW')  "'IW'" FROM DUAL; 
'IW'                                                                            
-------------------                                                              
04/10/2004 00:00:00                                                              
SQL> 
SQL> -- date truncated to the day (suppress hours) -- 
SQL> SELECT TRUNC(SYSDATE, 'DD') "'DD'" FROM DUAL; 
'DD'                                                                            
-------------------                                                              
08/10/2004 00:00:00                                                              
SQL> 
SQL> -- date truncated to the hour (suppress minutes) -- 
SQL> SELECT TRUNC(SYSDATE, 'HH') "'HH'" FROM DUAL; 
'HH'                                                                            
-------------------                                                              
08/10/2004 14:00:00                                                              
SQL> 
SQL> -- date truncated to the minute (suppress seconds) -- 
SQL> SELECT TRUNC(SYSDATE, 'MI') "'MI'" FROM DUAL; 
'MI'                                                                            
-------------------                                                              
08/10/2004 14:08:00                                                              

Validate Userid and password against LDAP directories Using PeopleCode


Following peoplecode is tested in 8.48.16 and assuming that you are using Oracle Wallet and LDAP libraries for connecting to ldap server. (Tested on HP*UX 11.11 server). It also assumes you have LDAP Port, Server name, Default Connect DN defined in PeopleTools -> Security -> Directory ->  Directory Configuration. LDAPS Port is optional but highly recommended. This can be used in following scenarios.

You are logged in PeopleSoft with generic id and you need to validate user's password against ldap directory. Or you want to see  programmatically if the user exist in LDAP with a valid password.


Create this as Class to Application Package: XX_UTILS

class LDAP
method ValidatePassword(&userid As string, &pwd As string, &directory_id As string) Returns boolean;
end-class;

method ValidatePassword
/+ &userid as String, +/
/+ &pwd as String, +/
/+ &directory_id as String +/
/+ Returns Boolean +/
Local string &defaultDN, &dn, &outDN, &server, &SSL;
Local integer &port, &nonsslport, &sslport, &EXECRSLT, &start, &num_chars, &ret;
Local Interlink &LDAP_BIND;
Local BIDocs &rootInDoc, &rootOutDoc;


SQLExec("select a.DSCNCTDN, b.DSSRVR, b.LDAPPORT, b.ldapsport from PSDSDIR a, PSDSSRVR b where a.DSDIRID = :1 and a.DSDIRID = b.DSDIRID", &directory_id, &defaultDN, &server, &nonsslport, &sslport);
If All(&sslport) Then
&SSL = "YES";
&port = &sslport;
Else
&SSL = "NO";
&port = &nonsslport;
End-If;


If All(&server, &port, &defaultDN) Then


&LDAP_BIND = GetInterlink(Interlink.LDAP_BIND);
&LDAP_BIND.UserID_Attribute_Name = "uid";
&LDAP_BIND.URL = "file://psio_dir.dll";
&LDAP_BIND.BIDocValidating = "Off";
&LDAP_BIND.SSL = &SSL;
REM &LDAP_BIND.SSL_DB = "e:\certs\cert7.db";
&start = 5;
&num_chars = Find(",", &defaultDN) - &start;
&dn = Replace(&defaultDN, &start, &num_chars, &userid);
&rootInDoc = &LDAP_BIND.GetInputDocs("");
&ret = &rootInDoc.AddValue("Server", &server);
&ret = &rootInDoc.AddValue("Port", &port);
&ret = &rootInDoc.AddValue("Distinguished_Name", &dn);
&ret = &rootInDoc.AddValue("User_Password", &pwd);
&ret = &rootInDoc.AddValue("Encrypted", "NO");


&EXECRSLT = &LDAP_BIND.Execute();
If (&EXECRSLT = 1) Then
&rootOutDoc = &LDAP_BIND.GetOutputDocs("");
&ret = &rootOutDoc.GetValue("Distinguished_Name", &outDN);
If &outDN = &dn Then
Return True;
End-If;
End-If;
End-If;


Return False;
end-method;

Sample code to call the function.

import XX_UTILS:LDAP;

Local XX_UTILS:LDAP &ldap = create XX_UTILS:LDAP();
Local boolean &return;

&userid = "userid"
&pwd = "xxxx";
&directory_id = "LDAP"; 
&return = &ldap.ValidatePassword(&userid, &pswd, &directory_id);
If &return Then
/* success */
else
/* failure */
end-if;


CTY: Ketan Kothari


Simple Code to check values in Array

To check the values of array , delete this code after done
&J = 1;
While &LNARRAY.Next(&J)
WinMessage(&LNARRAY [&J]);
End-While;

Code to Send Email from Oracle DB

Code to Send Email from Oracle DB

DECLARE
v_connection UTL_SMTP.CONNECTION;
BEGIN
v_connection := UTL_SMTP.OPEN_CONNECTION('mail.company.com',25);
UTL_SMTP.HELO(v_connection,'mail.company.com');
UTL_SMTP.MAIL(v_connection,'contact@company.com');
UTL_SMTP.RCPT(v_connection,'contact@company.com');
UTL_SMTP.DATA(v_connection,'Testing Hello Mail');
UTL_SMTP.QUIT(v_connection);
END;

Debugging Functionality in Peoplesoft

Open Configuration Manager -> Profile ->Create.
• Select Connection Type as Application Server.
• Enter Application Server Name
• Machine Name or IP Address should be your machine IP address on which application server domain resides.
• Port Number should be WSL port number.

Turn on Debugger Service. Bring the following changes in your PSAPPSRV.CFG file
Location: \\PS_HOME\appserv\DomainName\
Psappsrv.cfg:
..[People Code Debugger]
;————————————————————————-
PSDBGSRV Listener Port=15000
...
[PSAPPSRV]
;=========================================================================
; Settings for PSAPPSRV
;=========================================================================

;————————————————————————-
; UBBGEN settings
Min Instances=2 Give >= 2
Max Instances=2
Service Timeout=0 Give >= 2
Go to PSADMIN -> Quick Configuration. Check whether the PC Debugger feature is enabled or not. Make it yes, and start the application server domain.
PC Debugger should be set to yes.

• Login into Application Designer and PIA with same User ID
Go To Select PeopleCode Debugger Mode
àDebugàApplication Designer

Press ctrl+F9 to set the Break Points
Press F5 to run the execution of program

Tuesday, October 6, 2009

PeopleSoft Query Security

What do u mean by query security. How it is implemented in PeopleSoft?

When you talk about PeopleSoft Query Security, these are things that are taken into consideration:

  • Query Profiles...Specifies what query operations, such as create and run, are available to users. For example, you may want certain users to run only existing queries, not create new ones.
  • Query Access Group and Trees....Collections of record definitions in a query tree. After you build a query tree, you can query any table in the access groups that are accessible to you
  • Define row-level security and query security records....Provides data permission security when you access data using the PeopleSoft Query tool.

All of these are utilized by PeopleSoft Query through user's security settings, row-level security, and primary permission list. Query Profiles are setup in Permission List (PTPT1000) , under Query Tab. Query Access Groups are attached to Permission List (HCSPQUERY), under Query Tab.

About Query Security Record:

One of the Security Feature in PeopleSoft is Data permission security, or row-level security
• It Controls access to user data on an individual or group basis.

• It Specifies the rows of data that user is permitted to retrieve.

For example, you might want users to be able to review personal data for employees in their own department, but not for people in other departments. You would give everyone access to the PERSONAL_DATA table, but would enforce row-level security so that they could only see rows where the DEPTID matches their own.

Since there is Query Tool, through which you can retrieve sensitive data, You can implement row-level security by having Query search for data using a query security record definition. The query security record definition adds a security check to the search.

To apply row level security:

1. Select PeopleTools, Application Designer to open the Application Designer, and open the

record on which you want to apply row-level security.


2.With the record definition open in the Application Designer, click the Properties button, and select the Use tab from the Record Properties dialog box.


3.Select the security record definition (usually a view) in the Query Security Record list box.


4.Once you've set the query security record definition, click OK to close the Record Properties dialog box, then save the record definition.


The PeopleSoft system automatically adds a WHERE clause to the SQL, joining the user's user ID, primary permission list, or row security permission list to the following key fields if they are present:

• OPRID

• OPRCLASS

• ROWSECCLASS

How to indentify bundles that have been applied?

Question: How do i know what bundles have been applied in my PeopleSoft Application System?

Answer: All bundles update activity that are been applied to PeopleSoft system is logged into a table called PS_MAINTENANCE_LOG.you can check to this table to see what Bundles or Tax Updates have been applied. Below are the steps how to write a query in QueryTools (2 tier):

if you want a PS Query to be built, make sure you have access to this table. if you do not, you need to add this record into query security.

Bundles Query:

SELECT A.UPDATE_ID, A.DESCR, A.DTTM_IMPORTED, A.FIXOPRID, A.APPLYOPRID, A.PRODUCT_LINE, A.RELEASEDTTM, A.RELEASELABEL, A.MAINTLOGTYPE, A.DESCRLONG FROM PS_MAINTENANCE_LOG A WHERE upper(A.DESCRLONG) like '%BUNDLE%' ORDER BY 2 DESC

Tax Update Query:

SELECT A.UPDATE_ID, A.DESCR, A.DTTM_IMPORTED, A.FIXOPRID, A.APPLYOPRID, A.PRODUCT_LINE, A.RELEASEDTTM, A.RELEASELABEL, A.MAINTLOGTYPE, A.DESCRLONG FROM PS_MAINTENANCE_LOG A WHERE upper(A.DESCRLONG) like '%TAX UPDATE%' ORDER BY 2 DESC

Trace AE and COBOL processes


Question: How to trace AE and COBOL processes using the Process Definitions instead of setting on Process Scheduler / App Server Config files.

ANSWER;

For AE, Open the Process Definition under PeopleTools, Process Scheduler. Go to the override tab, and on the Parameter list line select Append from the dropdown, and in the edit box next to it, you can use the desried combination of traces, they all are;
Parameter List Append -TRACE 7 -TOOLSTRACEPC 3596 -TOOLSTRACESQL 31

Save the Defnition and hence forth this program will be traced each time it is run, until this is removed. Using Both the -TOOLSTRACEPC and -TOOLSTRACESQL together should only be done when required, as the output from both go into the same file, making it very large and difficult to read. For normal program tracing using just the;

-TRACE 7 -TOOLSTRACEPC 3596

Give the Application Engine Trace, which traces the SQL in an AE program, and the PeopleSoft Trace, which is the pcode trace.

The above settings have equivelent settings in psprcs.cfg, they are;
TraceAE= -TRACE output goes into Application Engine Trace (.AET) TracePC= -TOOLSTRACEPC output goes into the PeopleTools trace file (.trc) TraceSQL= -TOOLSTRACESQL output ALSO goes into the PeopleTools trace file (.trc)
Again, depending on what the program is doing, most commnoly we'd use the -TRACE and -TOOLSTRACEPC together.

The only time I use the -TOOLSTRACESQL is when we're looking for a problem with the psae program itself.

For COBOL the idea is similar, we won't be appending to the parameter list instead we'll be overriding it. So first step is to open the appropriate Process Type Definition, example;

Process Type defn COBOL NT/Win2000 ORACLE

Copy the whole parameter list line into you mouse clipboard;

%%PRCSNAME%% %%DBTYPE%%/%%DBNAME%%/%%OPRID%%/%%OPRPSWD%%/%%RUNCNTLID%%/%%INSTANCE%%//%%DBFLAG%%

Then open the Process Definition for the particular COBOL Process, go to the Override Tab, and on the Parameter list line, select Override from the drop down. Then in the Parameter Edit box, paste the whole parameter list from the Process Defn we just got;

%%PRCSNAME%% %%DBTYPE%%/%%DBNAME%%/%%OPRID%%/%%OPRPSWD%%/%%RUNCNTLID%%/%%INSTANCE%%//%%DBFLAG%%

Notice at the end of the line after the %%INSTANCE%% and before the %%DBFLAGS%% there are 2 // We need to insert the desired bit map number inbetween the slashes.

Choose the bitmap number you want to use for the trace, and put it between the slashes like so;

%%DBTYPE%%/%%DBNAME%%/%%OPRID%%/%%OPRPSWD%%/%%RUNCNTLID%%/%%INSTANCE%%/255/%%DBFLAG%%

Save the Process Definition and once you launch the COBOL or AE program you can go to the Process Monitor, Details, Parameter List, and see the expanded command line and you'll see your trace value inserted;

Command Line: PSRUN PTPDBTST ORACLE/E840D20P/VP1/%OPRPSWD%/1/475/255/%DBFLAG%

With both the AE and Cobol traces done like this once this is done, everytime the program runs it will be traced. Need to undo all of this setting the override back to None in both Definitions will turn it off.